
Legendary DXer and popular amateur radio author Bob Locher, W9KNI, took a break from his “Tales from a Serial Sniper” series on OnAllBands to write about the travails and triumphs of routing wires and cables. Valuable lessons for both new and experienced operators abound here. Enjoy!
***
Wireless radio? The only hams for whom it is a wireless hobby are the “shack on the belt” crowd, and even they need charger cords. You want a truly wireless hobby? Stamp collecting, kayaking, tennis, and golf all spring to mind. Ham radio is decidedly NOT a wireless hobby!
Our shacks are full of wires! Keyer paddle cords. Mic cords. Power supply cords. Coax. Rotator control wires…and more. In too many cases, mine included, a rat’s nest of wire. And that’s just talking about inside the house! Outside we have many more—dipoles, coax, radial wires, rotator control lines, maybe guy wires. Wire everywhere!
A Wire Story
I had moved to a new QTH in southwest Oregon, what I figured would be my last move. The shack was situated on the main floor. Actually, the house is a one story built on the side of a hill but with a walk-out basement. It was necessary to run cables down from inside the house to the lower basement level, then back into the house, through switching equipment, then back outside through the wall again and onto the antenna field, which was on a hilltop behind the house.
The main floor had sort of an overhang above the basement, so I was able to create a hole through the floor of the shack going down outside the house. I then put in a plastic pipe to contain the wires and close it up in shipshape fashion.
Having had some experience with plastics in business, I knew that of the choice between PVC and ABS pipe, ABS was clearly the superior option, albeit somewhat more expensive. ABS has far superior UV resistance against sunlight and also better characteristics for cementing pieces together. ABS joints are actually plastic-welded—the ABS-specific cement dissolves the surfaces of the joints being bonded and quickly evaporates, leaving the two surfaces now melded into one.
Physical constraints limited the size I could use to two-inch ID pipe, a standard size. I did a workmanlike job of it. I brought the pipe down the wall and then back into the basement, using ABS pipe and a sweep, along with ABS cement. Where it came through the wall inside below, I glued a flange on the pipe so that it was tight. I painted the outside portions of the pipe, first with a primer and then a finish coat that matched the house siding. This served to further make it sunproof. I ran a messenger rope, RG-213 coax, and rotator control wires down from upstairs, and I was in business—for a few years. Ah, the best laid plans of mice and men…
But times change. I added two more towers to the antenna farm, with more Yagis, more cable, etc. To deal with all this, I built a new shack on the first floor of the house, directly below where the original main floor shack was located. The cables going through the pipe were pulled back in. I sealed the upstairs pipe, and it remained unused for about ten years.
But plans changed again. Not to put too fine a point on it, I am getting older. And I decided I wanted the shack to be on the main floor again. But this time I decided to do it differently. I would put a remote shack on the main floor and leave the primary gear below. I had earlier wired the house with Ethernet as much as possible, and that would also make the remote station cleaner and simpler.
I started out with one antenna and control in the remote shack and ran an Ethernet cable and an RS-232 cable for the rotator control to the new remote location above. The RS-232 cable fed into the remote shack computer, giving me control of the antenna direction. All was working fine.
But that was not why I had three towers with Yagis good for 40-10 meters. The whole idea was that the remote station would become the major operating position. The remote transceiver controlled the main rig, and that, in turn, automatically switched the station to the correct antenna for the band. The main obstacle left was to establish control of the other two antenna rotators from the remote shack computer. Also, my station used an external wattmeter that also had RS-232 output along with software to put the readings on the remote shack computer screen, so I wanted that feature as well.
Thus, the net requirement was a total of four RS-232 cables coming to the shack computer plus the Ethernet cable—and, of course, a messenger rope for pulling cables. The shack computer did not have four RS-232 connectors, so RS-232-to-USB adapters were used. Given that each of the RS-232 devices used different protocols for speed, that was a neat solution in more ways than one.
And that’s when the fun began…
Much of the following will be things for you NOT to do! (Kids, don’t try this at home. Trained Extra Class operators are required for screwing it all up beyond belief.)
Data cables are usually black. I had tried paper labels in the past to identify each. That turned out not to be a satisfactory solution—the labels would come off. I found electrical tape to be a better solution. It now can be easily bought in short rolls with narrow widths in different bright colors. A couple turns of a given color around each end of the cable just below the connector made identification easy and reliable.
I figured that dragging DB9 connectors through a fairly narrow orifice could cause problems. (Truer words were never spoken!) So, I decided I would wrap them in blue masking tape. The blue tape has the virtue of not leaving residue adhesive on the connector after removal. This turned out to be true as far as it went, but the tape could easily tear under any kind of stress.
My son, W7GH, having commercial experience in this area, suggested gaffer tape instead. This proved to be a far more satisfactory solution. Gaffer tape is essentially duct tape but with a no-residue adhesive. Like duct tape, it is fabric tape with a sealer and an adhesive, and the same tearing and strength characteristics. Gaffer tape is black whereas duct tape is gray.
I started out with two RS-232 cables pulled through. To do so, I staggered the DB9 connectors and wrapped them with gaffer tape, with tape going around the messenger rope. I carefully laid the cables on the floor, fed the front of the bundle into the entrance of the pipe, then went upstairs and pulled everything up. There was some resistance partway, so “in an abundance of caution” I went back downstairs and found the bundle had caught on a table leg. That was easily corrected. I resumed the pull and all was successful.
I hooked up the RS-232 connectors to the USB adapters and plugged them into the computer. I sorted out the software issues and, in due course, had everything working—all shipshape and Bristol fashion.
The problem then was that I needed to drag two more RS-232 wires through…
OK. Everything was already neatly buttoned up. I really did NOT want to have to disconnect the wires and pull them back out and start a new cable run. And, hey, the bundle pulled easily and was a lot smaller than the pipe. Hmmm. Yeah, I can probably pull two more cables through without having to undo the existing bundle, right?
Have you ever heard of Murphy’s Law? The second axiom of the law is “If it can possibly go wrong, it will.” Guess what? It’s TRUE!
I decided to pull the additional two RS-232 cables, complete with flanged DB9 connectors attached, through to complete the remote setup. I laid the cables out. I gaffer-taped the ends. I started pulling but met resistance. I went back to the bundle and pulled it back out. All seemed in order. I started the bundle into the pipe again and began pulling. Again, there was resistance. From the length of the pull, it was clear that the resistance was at the first bend of the pipe, where it went through a sweep.
OK, that should be no big deal. I pulled harder, expecting it to pull through and be free…WRONG! I tugged fairly hard, and it was obvious it wasn’t going to come through. I went back to the other end and tried to pull the cable back out. It would not come free—it was jammed.
This began a period where I ask the reader to avert their eyes and cover their ears. I tried everything I could think of to get the cables pulled apart. Nothing worked. The thought kept running through my find that I was going to have to saw through my beautiful pipe installation to be able to fix the problem. Sadly, after several days of trying to figure out something else, that was exactly what happened.
I had to be extra careful cutting the pipe wall as I did not want to cut into the cables inside. I used a hacksaw and very carefully cut as much as I could, but the pipe was close to the house, restricting movement. A keyhole saw pretty much finished the cut. In some places the cut had clearly gone through the pipe wall, in other places not so much. When I thought I was close enough, I whacked it with a rubber mallet—and it sheared.
So, I was through but could not yet see the source of the problem. I could not pull the pipe through the wall. I had glued a flange on the inside end to keep it tight. I could not cut the flange off. It was flush to the drywall. I did not want to make another cut in the pipe, fearing cutting the cables inside. Finally, I got a vise grip with a fairly narrow jaw and was able to twist the upper piece of the pipe enough to the side so that I could get the vise grip over the pipe. I just started pulling on the pipe and it came out, taking a piece of the sweep with it. In a matter of minutes, I had it opened out.
I was amazed at the jumble I found. The RS-232 cables were indeed hopelessly snarled. There was no way I would have ever been able to clear it cleanly. It was time to start rebuilding the system.
But in the meantime, I had been doing my homework on another front. It seemed like running four RS-232 cables through the pipe somehow seemed excessive. I discovered a possible solution, a TECHTOO Four Port USB to Serial RS-232 DB9 Adapter USB to Serial Converter Serial Cable Nine-Pin. This device promised to accept up to four USB ports and feed them into a single USB cable. (A nine-port version is also available at a higher cost, but I did not think I would need that. But I could always switch over to that if needed at a later date.) The RS-232 ports did not have to have identical characteristics—different speeds were OK.
One of the advantages of RS-232 is that it can go for relatively long distances — USB, not so much. So I checked specs: USB 2.0 is good for about 16 feet. For my installation that was just good enough. It would be about 12 feet from the device to the port on the back of the remote shack computer. I ordered the device, as well as a ten-foot USB extension cable, and they soon were at hand.
At this point I was very gun-shy. I decided that I would test the adapter and USB extension BEFORE I committed it to the pipe. I laid it all out, connected the ports and tested. Lights started up on the converter. I checked the device manager page on Windows 11. Hey, there it was, reporting in for duty. Everything seemed to be working as expected and as I had hoped!
From that point on it was pretty much downhill sledding. A trip to the home building and supply store got me the replacement ABS parts I needed. I wire-brushed the paint off the portion of the pipe that the extension union would be added to. I got all the wires and cables out of the basement end of the pipe and examined them carefully to see that the sawing had not hurt them. One cable had a nick in the jacket but was fine, so I taped it up a bit. Then I fed all of the cables through the new parts and reassembled them.
But this time, I did not use ABS cement for the pipe-to-sweep connection. I’d like to think I’m getting smarter as I get older. Instead, I used outdoor-rated silicon caulk. This would have the virtue of making disassembly much easier and less destructive at a later date. (I hope never to test that thesis…)
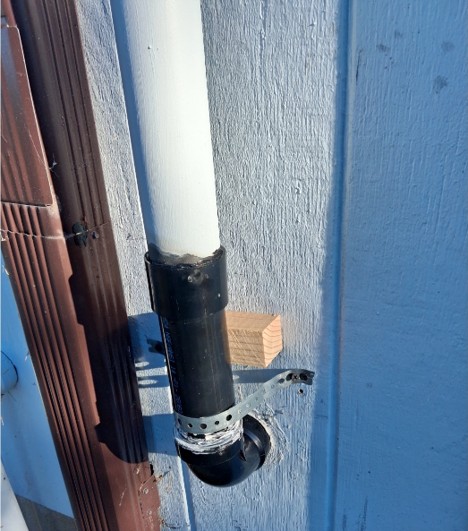
There was still one minor issue. I was determined not to put a flange on the pipe on the inside of the wall this time. So how to keep the pipe sweep pushed up against the wall? I figured out an inelegant but cheap and effective solution using plumber’s hanger strap, two sheet rock screws, and a wooden “pillow.” The photograph below best explains this.

So, everything seemed ready. I laid out the cables to be pulled, wrapped them in gaffer tape, and firmly attached the messenger rope. Then I shaped a “noose” onto the wire bundle with gaffer tape and pulled it through. It went as if it were greased! I connected everything up and it all worked! The nightmare was behind me. Isn’t wireless ham radio FUN?
Once everything was working for a couple days, I primed and painted the outside pipe once again. This all happened several months ago—I am very happy to report that everything continues to work perfectly.
Checklist for running wires and cables through pipes:
- ALWAYS have paddles or oversized washers at the end of your messenger rope so it can’t get pulled through.
- The messenger rope should be at least 2.3 times as long as the run inside the pipe.
- Use a wire pulling lubricant for longer runs of larger bundles of wire or cable.
- Be sure each end of every wire or cable is tagged or color coded at both ends.
- If you MUST pull another RS-232 cable through an already-populated pipe, there is one relatively safe way: Cut the connector off the end of the cable, being sure to note the colors of the wires. Now pull the unterminated cable through carefully and well-taped to the messenger wire. Then solder a plug back onto the cable.
The post Tales from the Shack by Bob Locher, W9KNI: Pulling Coax Cables & Control Cables Through a Plastic Pipe appeared first on OnAllBands.